The Making of Mojocasts
szabgab, who has quite a few screencasts, asked me to explain how I made the mojocasts.
Creating them has been quite the learning curve. My initial inspiration was Vimcasts, and although I don't have the hip accent, I figured I could put something interesting together for...something. It didn't take to long to settle on Perl and my preferred source of Perl unicorns, Mojolicious.
A Vimcast has a very cool, down-to-earth presentation; the music, the tone of voice, and the presentation as a whole tell the viewer, "Yeah, Vim is just that cool, and if you learn this, you'll be that cool as well". Presentation is vital: the Apple logo on most of my devices state as much.
Given Perl's less than stellar rep among the masses, I wanted something to counteract the stale feeling that Perl's critics likely feel - something that screamed "Fresh". Remember, we're talking about feeling here, not facts. I figured the composer of Vimcast's jingle would give me place to start, and luckily, the same composer had a royalty-free tune that broadcasted exactly the feeling I was looking for. Go ahead, listen to the mojocast intro music...close your eyes and picture a world with that theme music.
It's happy. It's fresh. It's a whole new adventure. Everything is going to be different now.
If that's not perfect for a Modern Perl presentation, I don't know what is. Tie that in with the Mojolicious theme of light and fluffy clouds, rainbows, and unicorns...hey, we've got something here.
The content was easy enough - show people how easy it is to get started. Quickly. From scratch, with no clutter. Show them exactly what they need to see, and nothing more. Walk them through the process, and throw in a couple "Huh, that's neat" moments.
I used Screenflow* to capture the screen. After toying with several resolutions, I changed a secondary display to 800x600 and recorded all the actions in sequence, leaving the audio for later. Screenflow allows you to fade opacity levels over time for images and video clips, which is how the intro shows the clouds and logo text in succession. I found that timing isn't important at this stage - you can always modify the speed of clips later on as necessary.
Technically, you could do the entire project from within Screenflow, but the interface is somewhat cumbersome when dealing with the entire timeline. My goal from the beginning was to use iMovie, so I decided to export it.
I'm going to save you a lot of trouble and give you a screenshot of the optimal settings you want to use when transferring a video for use in another program.
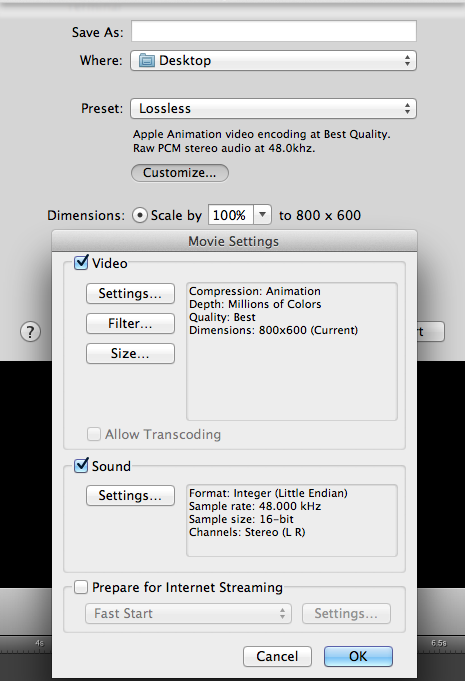
There. You have 4 more hours of your life to do something useful with.
iMovie is wonderful. Transitions, text overlays, and image importing are nearly everything you need for a decent screencast. With iMovie '11, you can add voiceovers and change the audio levels with sub-second precision, and see whether the voice levels between clips are equivalent at a glance.
I imported the full movie, and then copied each section of the imported movie into the main timeline according to topic. I learned over time that it's important to mark each section with chapter markers, since the visual representation in the timeline is at best an estimate, and it's easy to get half-empty terminal windows mixed up.
Initially, I used the built-in Macbook mic, and happened to choose a perfect spot at my desk that detected no background noise. I ended up having to re-record all the voiceovers, and learned that the magical spot at my desk was not so easily reproducible. The second episode made use of a Audio Technica AT2020 USB Cardioid condenser microphone, recorded at 50% input volume with -40dB Noise Reduction and voice enhancement enabled. Alias pointed out that professional voiceovers are recorded while standing, so I adjusted my workstation as such; I think you'll agree that Mojocast #2 is a marked improvement in audio quality.
After all the recording is done, it's time to make video edits. There's no shortcut here. It simply takes time.
- Watch the whole video.
- Make sure there's enough time between statements so that viewers can take in the visual and auditory information without feeling rushed.
- Make sure the video matches exactly what the voiceover is talking about. If you're talking about reloading a page, show the action as the word is said.
- Repeat until you can't stand it anymore
That's pretty much it.
I hope this is helpful to some folk. Thankful readers should buy me some cookies.
Go forth, and make some [your cool subject]casts.
*Update 2012-05-27
Quicktime now supports screen capture with more accurate color reproduction than Screenflow. It is recommended.
 I do not like the status quo. There is always a better way; the question is whether you care enough to find it.
The content, flow, and esthetic of first two screencasts were excellent! Nice Job!
I'll buy you some cookies. I need to know the shipping address though. :)
Sweet! Pun intended.
Use the following address:
#1 Glen Drive, Chico, California, USA
I've contacted the shipper, and they'll ship to the correct location as necessary.
Beautiful job on the screencasts, looking forward to more!
I've made a couple of screencasts, and the process you describe is exactly right. I didn't have iMovie and found the audio level to be a major problem. The whole process is very time consuming, as in one hour per minute!