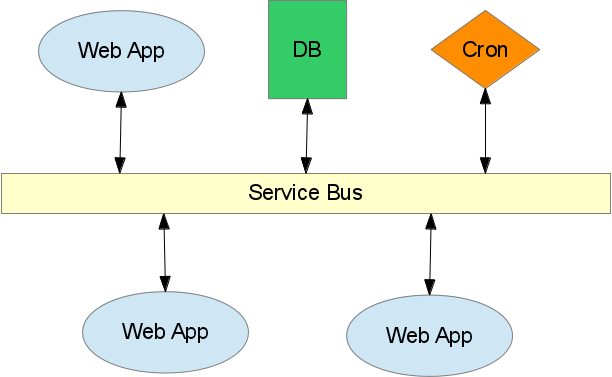
In the following I describe how to build (from scratch) a simple Catalyst
application that acts as a service bus for a collection of other Catalyst
applications.
Here I'm using the term service bus to describe an application that provides
web services to other applications (rather than, say, a JavaScript enabled web
browser). This service bus acts as a central hub, taking requests form
applications for tasks that sit outside their scope and either executing those
tasks or passing them on to other applications.
The following assumes you have a working Catalyst development environment (see
www.catalystframework.org for instructions).
A Service Application
Our service bus will communicate with the other applications using simple HTTP
requests and will pass data using JSON strings. Let's start by using the
Catalyst helper script to make a Service application:
> catalyst.pl Service
...
> cd Service
This generates a skeleton Catalyst application under the Service directory.
A lot of files are generated, but, for the moment, we are only interested in
the following:
service.conf                     # configure our app
script/service_server.pl         # run our app
script/service_create.pl         # extend our app
lib/Service/Controller/Root.pm   # actions for paths under /
Our service bus is going to pass around JSON data, so let's create a JSON view
> ./script/service_create.pl view JSON JSON
This creates the file lib/Service/View/JSON.pm. We want this to be our
default view and for that view to generate JSON encoded strings from the
response_data key in the stash. Edit service.conf and add the following
to the end of the file:
default_view JSON

<View>
    <JSON>
        expose_stash response_data
    </JSON>
</View>
Now we will setup actions to handle some basic requests for testing the
application. Edit lib/Service/Controller/Root.pm and add the following after
the initial documentation boilerplate:
use JSON;

sub auto : Private {
    my ($self, $c) = @_;

    # JSON view requires response_data key to be well defined
    $c->stash->{response_data} = { message => 'no message'};

    # decode and stash POST data
    if (my $data_str = $c->request->body_params->{data}) {
        $c->stash->{request_data} = decode_json($data_str);
    }
    return 1;
}

sub ping : Local {
    my ( $self, $c ) = @_;
    $c->stash->{response_data} = { message => 'pong'};
}

sub echo : Local {
    my ( $self, $c ) = @_;
    $c->stash->{response_data} = {
        data    => $c->stash->{request_data},
        message => 'echoing sent data',
    };
}
We now have a minimally functional service bus, that supports two requests:
ping and echo. We can run this Service application in a terminal with
> ./scripts/service_server.pl
...
HTTP::Server::PSGI: Accepting connections at http://0:3000/
and test it in another terminal using the GET and POST wrappers from LWP.
> GET http://localhost:3000/ping
{"message":"pong"}>

> echo 'data={  "foo"  :  "bar"  }' | POST http://localhost:3000/echo
{"data":{"foo":"bar"},"message":"echoing sent data"}>
The debugging output in the first terminal shows how these requests are being
processed. For those new to Catalyst, lets break down of what's happening
with the POST request:
The Service application that we started is listening for HTTP requests
at port 3000 on localhost
When we request the path /echo, the Catalyst dispatcher maps this
to the echo() action in the Root controller.
The dispatcher then constructs and executes the following chain of
of actions (registered subroutines) in the Root controller:
auto() -> echo() -> end()
auto() decodes the string in the data parameter and stashes
that value under request_data.
echo() sets the echo key in the response_data stash to the
same value as request_data.
end() renders the current view and sets the HTTP response content to
the result.
The current view is the default view Service::View::JSON. This view
encodes the value of the response_data key in the stash as a JSON
string.
With the echo example, I added a little white space to the data in the POST
request highlight the fact the passed JSON string gets decoded and re-encoded,
rather than just being echoed.
Leave this Service application running in its terminal: we'll use it in the
next example.
At this point the service bus is exposing a simple interface via the two
public paths:
/ping
/echo
This can be extended to cover whatever operations are required of your service
bus.
A Client for the Service Application
Now lets create a separate Catalyst application to talk to this service bus.
> catalyst.pl MyApp
...
> cd MyApp
First we'll create a model to handle the communication with the service bus:
> ./scripts/myapp_create model Service
This creates the file ./lib/MyApp/Model/Service.pm. Edit that file and add
the following after the documentation boilerplate:
use LWP::UserAgent;
use JSON;

has _ua  => (
    is => 'ro',
    default => sub { LWP::UserAgent->new(timeout => 10) }
);
has _url => ( is  => 'rw', isa => 'Str' );

sub BUILD {
    my ($self, $args) = @_;
    $self->_url($args->{url});
}

sub post {
    my ($self, $path, $data_ref) = @_;

    my $ua = $self->_ua->clone();
    $path = $self->_url . '/' . $path;

    my $response;
    if ($data_ref) {
        $data_ref = encode_json($data_ref);
        $response = $ua->post($path, { data => $data_ref });
    }
    else {
        $response = $ua->get($path);
    }

    if ($response->is_success) {
        if ($response->decoded_content) {
            return decode_json($response->decoded_content);
        }
        return;
    }

    warn "$path: " . $response->status_line;
    return;
}
Note the two private attributes. The _ua attribute stores an LWP user agent
object that we will clone before we use it. This is so we don't have to worry
about the object growing (by recording request history) over the
lifetime of the application. The _url attribute is set up to allow us to
easily configure the URL for the service bus that this application talks to.
Edit myapp.conf and add the following:
<Model>
    <Service>
            url http://localhost:3000
    </Service>
</Model>
Now when MyApp wants to post a message to the Service application, it will use
http://localhost:3000 as the base of the URL used in the HTTP request.
Lets create an action to test the communication between the two applications.
Edit ./lib/MyApp/Controller/Root.pm and add the following routine:
sub ping_service_bus : Local {
    my ( $self, $c ) = @_;

    # set the response body directly rather than using a view
    if (my $response = $c->model('Service')->ppost('ping')) {
        $c->response->body( $response->{message} . "\n");
    }
    else {
        $c->response->body('Could not ping the service bus');
    }
    return;
}
To keep our example simple, we set the response body directly in the
ping_service_bus action, rather than using a view.
We run can run this application in another terminal, but we have to use
a different port since port 3000 is already in use by the service bus.
> ./scripts/myapp_server.pl -p 3001
...
HTTP::Server::PSGI: Accepting connections at http://0:3001/
We can see the two applications communicating in yet another terminal with
> GET http://localhost:3001/ping_service_bus
pong
Extending the Interface
Now that we have a skeleton service bus, we can extend its public interface
(the collection of requests it accepts) and the corresponding operations it
performs. Details of this a very specific to your application, but we can
give some examples that highlight the use of the Catalyst framework.
Suppose you have two types of applications that will connect to your service
bus: a Sales application used by sales staff and an Inventory application used
by warehouse staff. These applications were built independently, but it would
be great if they could communicate: sales staff could know if products are
already in stock; warehouse staff could be informed when stock needs to be
ordered. This is something that could be accheived using a service bus. As
the business grows, management might require aggregate information about both
sides of the enterprise. You could build a Reports application that gathers
that information via extensions you make to the service bus.
As the service bus grows to handle many different types of requests, it may
make sense to organise them using namespaces. We could split our interface
into requests relating to sales and requests relating to inventory. With
Catalyst we do this by simply creating two new controllers:
> cd Service
> ./script/service_create.pl controller Sales
> ./script/service_create.pl controller Inventory
This creates the two files
lib/Service/Controller/Sales.pm       # actions for paths under /sales/
lib/Service/Controller/Inventory.pm   # actions for paths under /inventory/
With the default Catalyst namespacing, any requested path that begins with
/sales/... is handled by actions in the Sales controller, and any path
that begins with /inventory/ is handled by actions in the Inventory
controller. Using namespaces this way, the set of paths your service bus
accepts can evolve into a well structured API.
Suppose we want to allow third party clients to update their product pricing.
We have many third party client, but the process of updating pricing is going
to be the same. In addition, we will want to restrict access to these updates
to the appropriate party.
Catalyst chained actions allow us to create virtual paths that handle this
situation well. First lets create a controller to handle all paths begining
with /pricing/:
> ./script/service_create.pl controller Pricing
Edit the file lib/Service/Controller/Pricing.pm and add the following actions:
# matches: /pricing/(brand)/...
sub brand : Chained('/') PathPart('pricing') CaptureArgs(1) {
    my ( $self, $c, $brand ) = @_;

    if ($brand !~ m{^\w+$}) {
        $c->error("bad brand: $brand");
        $c->detach();
    }

    $c->stash->{brand} = $brand;
    return;
}

# matches: /pricing/(brand)/publish
sub publish :Chained('brand') PathPart('publish') Args(0) {
    my ( $self, $c ) = @_;

    $c->stash->{response_data} = {
        message => 'published pricing for' . $c->stash->{brand},
    };
    return;
}
If we restart our Service application we can now send requests to publish
pricing for diferent brands using different paths:
> GET http://localhost:3000/pricing/best_for_less/publish
{"message":"published pricing for best_for_less"}>
We can now use standard webserver access techniques to restrict access to
paths begining with /pricing/best_for_less/ to our 'Best for Less' clients.
With namespacing tecniques like the above, we can construct versitle
message heirarchies.
Other ideas
We can do a lot more with this. The following are just some thoughts.
Cron jobs
We could write an action to send us an email if our pricing data has
become stale, and set up a cron job to check for this at 9am weekdays
as follows:
0 9 * * 1-6 /usr/bin/GET http://service/sales/check_pricing > /dev/null
Databases
It is trivial to extend our Service application to access any number of
databases. Two possiblilies immediate occur.
Storing elements of the service bus configuration in the database
allowing us to change it on the fly.
Using the service bus to marshall data between different databases.
Security
A service bus can be used as an information security layer: access is
controlled at a single point and we can implement path based access rules.
Scaling
The service bus is just a web application and we can scale it in well know
ways. We can have any number of load balanced Service applications or
even put different instances in different locations.
Message Queues
Service bus is purely synchronous and is not a Message Queue. But but
a message queue could be a client to the service bus, or even a front-end.
Dancer
I would be interested to see if something similar (and more light-weight)
could be done with Dancer.
 Leaking memory all over the place.